List of Error Codes / Support Codes - TS3120
Solution
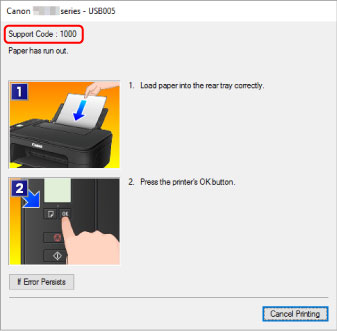
If an error occurs in printing, for example if the paper runs out or jams, a troubleshooting message appears automatically. Take the appropriate action described in the message.When an error occurs, a message appears on the computer screen and an error code on the LCD. For some errors, a support code (error number) appears.
When a Support Code and a message are displayed on the computer screen (Windows):
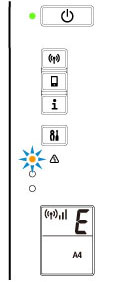
When an error code appears:
-
The Alarm lamp lights up and an error code appears.
-
The ON lamp and Alarm lamp flash alternately and an error code appears.
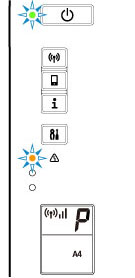
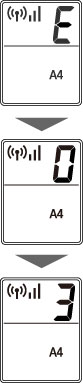
The error code appears on the LCD one by one.
If the error code is "E03":
Check the error code on the LCD and the support code corresponding with it. See the table below for details.
| Error Code | Support Code | Cause | Action |
|---|---|---|---|
| E02 | 1000 3442 3443 3444 3445 |
Printer is out of paper. Printing one side is complete if you are performing manual duplex printing. |
Load paper in the rear tray.
Align the paper guide with the paper stack when you load paper. Select a paper size for the paper in the rear tray by pressing the printer's Paper Select button.
|
| E03 | 1203 1300 |
The cover is open. Paper is jammed. |
|
| E04 | 168A | FINE cartridge is not installed properly. |
|
| E05 | 1401 1403 1430 1485 |
FINE cartridge cannot be recognized. | Check the following.
|
| E08 | 1700 1712 1714 |
Ink absorber is almost full. | Press the printer's OK button to continue printing. Contact your nearest Canon service center to request a repair. |
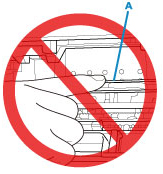
| E09 | 1890 | Protective material or tape may still be attached to FINE cartridge holder. | Make sure the protective material and tape have been removed from the FINE cartridge holder. If the protective material or tape is still there, retract the output tray extension and the paper output tray to remove it. Pull down the tape to remove the protective material. If the cover is open, close it. |
| E11 | 4102 4103 |
Cannot perform printing with current print settings. | Perform printing after you have changed print settings. |
| E12 | 4100 | Specified data cannot be printed. | If you are printing CREATIVE PARK PREMIUM contents, check the message shown your computer, make sure genuine Canon FINE cartridges are installed properly for all colors, and retry printing |
| E13 | 1686 | The ink may have run out. | The function for detecting the remaining ink level will be disabled since the ink level cannot be correctly detected. If you want to continue printing without this function, press the printer's Stop button for at least 5 seconds. Canon recommends to use new genuine Canon cartridges in order to obtain optimum qualities. Please be advised that Canon shall not be liable for any malfunction or trouble caused by continuation of printing under the ink out condition |
| E14 | 1684 | FINE cartridge cannot be recognized. | Printing cannot be executed because the ink cartridge may not be installed properly or may not be compatible with this printer. Install the appropriate ink cartridge. If you want to cancel printing, press the printer's Stop button. |
| E15 | 1682 | FINE cartridge cannot be recognized. | Replace the FINE cartridge. If the error is not resolved, the FINE cartridge may be damaged. Contact your nearest Canon service center to request a repair. |
| E16 | 1688 | The ink has run out. | Replace the ink cartridge and close the cover. If printing is in progress and you want to continue printing, press the printer's Stop button for at least 5 seconds with the ink cartridge installed. Then printing can continue under the ink out condition. The function for detecting the remaining ink level will be disabled. Replace the empty ink cartridge immediately after printing. The resulting print quality is not satisfactory, if printing is continued under the ink out condition. |
| E23 | 3446 | IP address and subnet mask are conflicting. | Press the printer's OK button. Disable the wireless direct or change the wireless LAN network configuration. When changing the network configuration, specify a unique subnet range for each of the wireless direct and the wireless LAN to prevent a conflict. For details on changing the network configuration, refer to the documentation for your wireless LAN router. |
| E31 | – | Failed in wireless LAN setup. | Press the printer's Black or Color button to resolve the error. If you are performing setup with WPS:
|
| E32 | – | Cannot find a wireless router during setup. | Press the printer's Black or Color button to resolve the error. Perform wireless LAN setup again. |
| E33 | – | Cannot connect because multiple wireless routers are connecting to the printer. | Press the printer's Black or Color button to resolve the error. Perform wireless LAN setup again after a while (about 2 minutes). If the above does not resolve the problem, refer to the instruction manual supplied with the wireless router. |
| E34 | 3440 | Easy wireless connect has failed. | Press the printer's OK button and retry Easy wireless connect. If the error is not resolved, use another method to set up wireless LAN. |
| E36 | 3441 | Easy wireless connect has failed. | Press the printer's OK button and retry Easy wireless connect. If the error is not resolved, use another method to set up wireless LAN. |
| E37 | – | Failed in wireless LAN setup. | Press the printer's Black or Color button to resolve the error. Take measures below.
|
| E38 | – | Cannot connect to a wireless router. Cannot change the LAN settings. |
Press the printer's Black or Color button to resolve the error. Check the following.
You cannot change LAN settings while you are using LAN. Change them when you are not using LAN. |
| E39 | 495A | Network error has occurred. | Turn off the printer and turn it back on. If this does not solve the problem, contact your nearest Canon service center to request a repair. |
| E45 | – | Cannot connect to network. | Press the printer's OK button to resolve the error. Check the LAN connection and network settings. Connection may be successful after a while. |
| E46 | – | Cannot connect to Internet. | Press the printer's OK button to resolve the error. Check the wireless router settings. |
| E47 | – | Cannot connect to server. | Press the printer's OK button to resolve the error and perform operations after a while. If you are using Google Cloud Print, it is possible that your printer is not registered. Make sure your printer is registered. |
| E48 | – | Cannot connect to server. | Press the printer's OK button to resolve the error and perform operations after a while. |
| E49 | – | Failed in connecting to Internet because network connection is being prepared. | Press the printer's OK button to resolve the error and perform operations after a while. |
| E50 | – | Failed in acquiring contents. | Press the printer's OK button to resolve the error and perform operations after a while. |
| E51 | – | Cannot connect to server. | Press the printer's OK button to resolve the error and perform operations after a while. |
| E52 | – | Failed in registering the printer to Google Cloud Print due to timeout. | Press the printer's OK button to resolve the error. |
| E53 | – | Only information registered to the printer is deleted because of failing to connect Google Cloud Print. | Press the printer's Black or Color button to resolve the error. Delete registered information of Google Cloud Print from your computer or smartphone. |
| E54 | – | Only information registered to the printer is deleted because of failing to connect IJ Cloud Printing Center. | Press the printer's Black or Color button to resolve the error. Delete registered information of IJ Cloud Printing Center from your computer or smartphone. |
| E55 | – | The printer is already registered to IJ Cloud Printing Center. | Press the printer's Black or Color button to resolve the error. Delete registered information of IJ Cloud Printing Center and register the printer again. |
| E56 | – | The online service is not available in your region. | Press the printer's Black or Color button to resolve the error. Contact the provider for where the online service is available. |
| E57 | 2900 | Scanning print head alignment sheet failed. | Press the printer's OK button and check the following.
If the error is still not resolved, try manual print head alignment. |
| E58 | – | Trying to start copying before you register the paper size. | Specify the paper size and start copying. Press the Stop button to cancel copying. |
| E59 | 2114 | Paper settings for printing do not match paper information set on printer. | Press the printer's Stop button to cancel printing. Check if the size of the paper loaded in the rear tray matches the paper size selected with the printer's Paper Select button. After checking the paper settings set at the printer driver, retry printing. |
| E61 | 3412 | Scanning original has failed. | Press the printer's OK button, and then follow the actions below.
If the error is still not resolved, specify the size of the original.  Important Important
|
| E62 | – | Unexpected error occurred while scanning is in progress. | Press the printer's Black or Color button to resolve the error. Change settings and perform operations again. |
| E63 | – | Reached the upper limit of pages which can be saved. | Press the printer's Black or Color button to resolve the error. No more pages can be saved in one file. Save the rest as different one. |
| E64 | – | Scanning original has failed. | Original is not placed on the platen glass or the original cannot be scanned. Press the printer's Black or Color button to resolve the error and check the following.
|
| E65 | – | Saving scanned data failed because the printer’s memory is full. | Press the printer's Black or Color button to resolve the error. Take measures below.
|
| P02 | 5100 | Printer error has occurred. | Cancel printing and turn off the printer. Check the following:
If this does not solve the problem, contact your nearest Canon service center to request a repair. Important
|
| P07 | 5B00 5B12 5B14 |
Printer error has occurred. | Contact your nearest Canon service center to request a repair. Note Note
|
| P03 P08 P09 P20 P22 P26 P27 P28 P29 |
5011 5012 5050 5200 6000 6500 6800 6801 6900 6901 6902 6910 6911 6930 6931 6932 6933 6936 6937 6938 6940 6941 6942 6943 6944 6945 6946 |
Printer error has occurred. | Turn off printer and unplug it. Plug in the printer again and turn it back on. If this does not solve the problem, contact your nearest Canon service center to request a repair. |
| P10 | B202 B203 B204 B205 |
Printer error has occurred. | Turn off printer and unplug it. Contact your nearest Canon service center to request a repair. |